
Using a scope on your rifle is extremely important for accuracy. The scope is the part of a rifle used to see objects far apart.
It’s designed to recognize bullet points and areas that can be affected by the bullet.
If the object is rightly used, it provides a more precise and safer shot within the suitable range if the rifle is directed correctly.
This guide will explore how to use a rifle scope for the best image available. We’ll discover how you can mount/adjust the scope, and share some tips on using scope on a rifle. Let’s get going.
Why Use a Rifle Scope?
A rifle scope is a device that helps you zoom in on your target and increase your accuracy. It will also help you shoot farther than with open sights, and the magnified view of the target makes it easier to hit moving targets.
You can even use a rifle scope for spotting game animals or other objects at long distances. Rifle scopes come in many shapes and sizes, so there is sure to be one that fits your needs.
Using a rifle scope will also save you time and money, as it eliminates the need for multiple shots. A single shot with a high-quality rifle scope can hit a target at up to 500 yards.
And with this, we’re at the end of our today’s guide. We tried to provide all the information you need to know about using and mounting a rifle scope. Now you are ready to hit the range and get your shots on paper.
I wish the information proves to be helpful. Thanks for reading this far. Always abide by the firearm regulations of the state you’re in. Good luck out there, and happy Shooting!
Understanding How Does A Rifle Scope Work
It’s normal to search the internet to get the best rifle as a novice. Most times – while doing this, you stand the chance of encountering different terms that can be confusing.
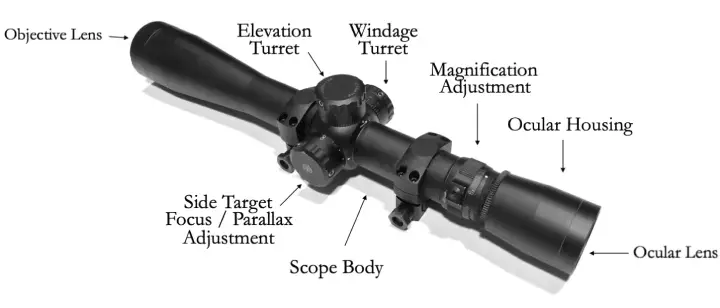
To effectively understand a rifle’s scope, knowing the fundamental component that creates the scope is vital. So let’s take a brief look at…
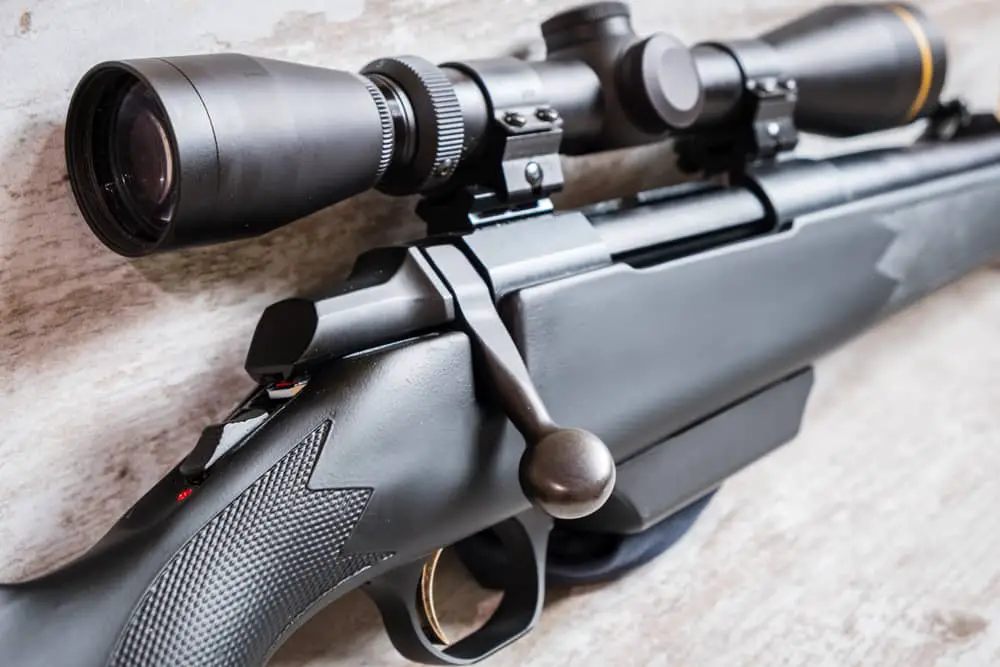
The Body
This is also known as a tube; it makes up the entire diameter of the scope. The body is approximately 1 inch or 30 millimetres.
Adjustment Knobs
Knobs are designed in different varieties; this includes flat tip screws, torrents, and finger pressure knobs, which are used for changing the windage and the elevation.
Elevation – this explains the motion carried out vertically, i.e., in an upward and downward direction. This motion path is a potential trajectory for bullets.
Windage – the windage on a scope refers to the horizontal path that covers both right and left movements and influences the trajectory.
Reticles
Reticles are designed with different styles; these are the crosshair and mill dots. The reticle is used to calculate the bullet’s landing point.
Complex reticles are designed to compensate for bullet drops or other factors that can be influenced by the surroundings.
Some reticles are illuminated with the use of ambient light or battery. Red dots, mill dots, and cross hairs can be great examples.
Eye Relief
This explains the distance between the eyes of the shooter and the leans located at the scope’s back.
To calculate the eye relief, estimate the total distance to which you can gain a crisp field of view without a dark ring around.
Proper eye relief is an essential factor to consider when preventing damage to the eyes caused due to high recoil calibres.
Sights
Also known as iron sights, these two metal pointers are mounted physically to the shaft located on your rifle.
They are used to create the path of travel in the direction of a bullet. These types don’t need adjustment as they come built-in with almost every type of firearm.
Parallax
Most modern scopes on rifles are designed with parallax. This term explains the difference between the reticle and the view the objective lens produces within the scope.
Once the rate of parallax is rightly adjusted, the reticle can lead to an optical focus on a target.
Weather Proofing
Quality rifles are usually sealed with an “O-ring” and designed to provide protection from fog, rain, snow, and other humid conditions.
Most rifles are grouped into fog proof, which means they are filled with nitrogen gas to help with the absorption of moisture.
A waterproof or fog proof, when immersed in a liquid, can remain dry without absorbing any moisture. This makes them suitable and reliable in different weathers.
Magnification Power
Rifle scopes are known by their magnification power, representing how well you can see at longer distances.
Most times magnification of the scope is expressed in two numbers, like 4X32.
Here, the first number showcases magnification, and the last represents the diameter of the ocular lens.
There are fixed powered scopes that can deliver a specific magnification. Variable power scopes, on the other hand, can offer a wide range of magnification power which you can adjust as you see fit.
The bigger the magnification, usually the heavier the scope gets. The same is true for the lens diameter as well. However, wider lenses can collect more light to deliver a vivid image, even in low-light conditions.
Optical Coatings
Most scopes are designed with unique lens coatings since they can increase brightness.
For a scope to generate light, it gives room for brighter and more contrasting sight pictures.
The coatings are usually explained as follows:
- Coated = one layer on a single lens surface.
- Highly Coated = single layer on all the air-to-glass surface lenses.
- Multi-Coated = several layers on the surface of the lens.
- Highly Multi-Coated = several layers directly on all forms of air-to-glass surfaces.
How To Mount A Rifle Scope
Mounting a scope to your rifle is an easy task and should be done correctly for the best results. Consult a gunsmith or the manufacturer if you require help.
Here’s how to go about this:
Step 1: Mounting The Bases
Check your rifle for the mounting option. Most modern-day rifle have grooves or holes on them to mount the scope. Make sure that the mounting system you choose fits your specific model.
Double-check if the rings have the right diameter and height you need. When mounting, keep the scope as low as possible on the rifle.
Use socket heads or Torx wrenches to adjust the base. Make sure that the objective bell isn’t touching the barrel. Also, make sure that you have enough room on the eyepiece so that the bolt can move freely.
Don’t forget to apply a thin layer of rust preventives before you mount the bass. It’s also a good idea to apply some thread-sealing compounds.
Step 2: Reticle Alignment
After you place the bottom half of the scope, align the reticle of the scope relative to your rifle. To do this, you’ll need to position the scope and tighten the top half in place.
Spare a little room for adjustments as you’ll need to set the windage, elevation, and parallax adjustments.
To align the reticle correctly, you’ll need to hold your rifle in a perfectly horizontal position, use a clamp if you have one. Then, level the reticle and make sure it is parallel to the barrel of your rifle.
Now adjust the reticle until it’s somewhat aligned with your rifle, more precise sharp-tuning will come later.
Once you make sure that everything is in place, move on to the next step.
Step 3: Eye Relief Adjustment
The term “eye relief” is used to describe the maximum distance between your eye and scope. It is important to set this correctly, as incorrect eye relief can cause severe damage if you fire a rifle.
To do this, adjust the scope so that it sits correctly on your rifle. After this, look through the scope and make sure that your field of view is clear and your eye is safe from possible recoil action.
Adjust the eye relief to a comfortable position. Once you have finished adjusting the eye relief, you are ready to move on to setting up your hunting scope.
Step 4: Bore Sighting
The process of bore sighting is used to align the scope with the rifle. The objective is to get your rifle and scope in alignment prior to shooting.
First, position a target downrange at least 25 yards away. Using a spotting scope or binoculars, make sure that you can see the bullseye.
Next, look through the barrel of your rifle and adjust it until the point of aim is aligned with the bullseye. Once you have done this, take a look through your scope. Using bore sights will help you set the aim perfectly every time.
If the reticle isn’t aligned with the point of aim, make some adjustments to your windage and elevation turrets.
Make sure that you make small, incremental adjustments after each shot. Continue doing this until the reticle is in alignment with your target at 25 yards.
Here’s a video guide if you’re interested! Read more on mounting rifle scopes here.
How to Use a Rifle Scope: What You Should Know
Sighting In Your Rifle Scope
In the next step on our journey to explore how to use a scope on rifle, we need to talk about the rifle scope sighting in (zeroing) process.
Most scopes need to be adjusted when you unbox them. So, this calls for personal adjustments and can be influenced by distance, velocity, wind, ballistic coefficient, and other environmental factors.
As to this effect, you will need more persistence and precision to get a perfect shot when carrying out the first adjustment.
Fire the rifle within 100 yards away before an additional step of adjustment to a range of your choice.
Bore-sighting involves the regulation of your scope to the point at which you want to shoot.
The truth is bullets can’t travel in a flat trajectory due to the influence of gravity on them.
Once you have your scope to 100 yards, the next is to get to a range that has a distance of 100 yards.
There are ranges made for short-distance shooting, so locating a proper location in the mountains will be a better option if you’re up for long-range shooting.
Lastly, shoot directly at a target once you have everything lined up.
Pull your trigger gently rather than the usual sudden tug. Tugging on a trigger can, most times, throw your shot off.
You would need to repeat the process if your rifle was moved during a shot. Once you can attain a fine shot as proposed, the next thing to do is to check the bull’s eye.
Most times, the bullet will fail to reach your target’s centre. Nevertheless, it should strike somewhere on the target.
Now measure out the point at which the bullet creates holes proportional to your target and pen down the differences in space.
For example, if you have a miss three to four inches low, you’ll need two to one inch to get to the bull’s eye.
Generally, it is important to use one type of ammunition, reloaded or factory ammunition. Using one ammo allows higher chances of accuracy.
When all the adjustments are ready, you can shoot over a long distance without a bullet drop.
Hunting or sniper scope sets are designed with two significant advantages. It makes viewing distant objects possible and helps make up for bullet drops, which is quite possible when using iron sights.
It is important to remember that all adjustments are made based on the user’s preference.
For example, you don’t need to have the impact of your bullet 100 yards away.
Aiming & Making Adjustments
The lens’s primary purpose is to give shooters room to access precise information about the point at which a bullet lands.
Once the scope is mounted directly on the rifle, the next thing to do is zero in the scope entirely or create room for different adjustments to more precise information.
Here, the scope requires you to accurately estimate information like the velocity, weight, and calibre to increase the chance of you hitting that target, let’s say, 200 yards down range.
Also, several environmental conditions should be considered, including the shot angle, windage, humidity, elevation, and, most times, the use of a tailwind or head to make up for the bullet’s trajectory.
When related to air temperature, the estimated distance to the ground temperature can most times be used to estimate a bullet drop or lift.
Adjustments in the Field
Most sniping rifles and sniper scopes used in the military are designed with an elaborate that helps detect environmental conditions like wind speed and humidity.
These factors are essential to consider to zero the scope within the field.
Most outdoor shooter rifles feature reticles based on different environmental conditions.
It all depends on the selected bullet; a zero range can cause the impact of your bullet point to go through the reticle location within the area of the scope view.
Precautions to Take
Adhering to federal, state, and local rules and regulations while carrying out a shooting practice is essential.
The regulation on how to use a rifle scope and firearms usually changes from one particular state to another.
Getting an update from a jurisdictional authority within your territory is important to get more information regarding restrictions and guidelines.


Leave a Comment