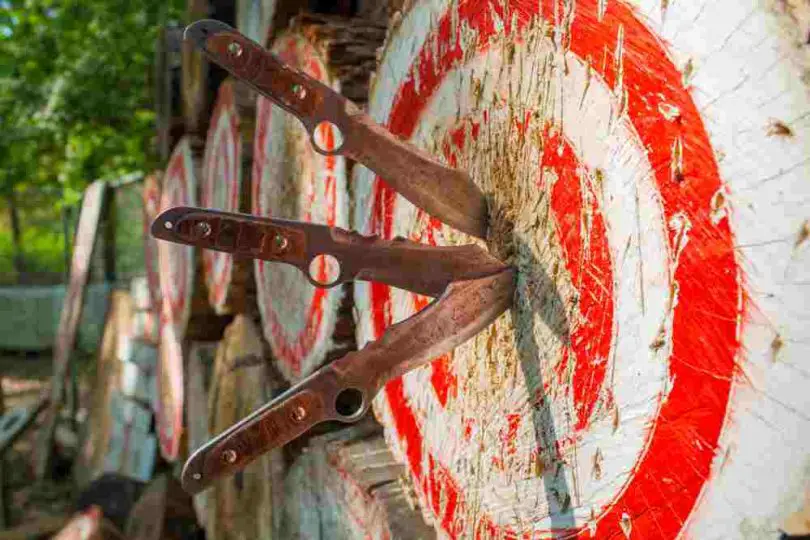
Knife throwing may not be a popular sport, but it has hardcore followers and fans. When you want to learn how to throw a knife straight, this usually means you’re taking your sport seriously and really trying to master the game. We’re here to familiarize you with all the no-spin throwing techniques.
Check out these methods in our “How to Throw Throwing Knives” guide one by one and try them today! See which one suits you the best!
How to Throw Throwing Knives: Understanding the Basics
What’s No-Spin Throwing Knife All About?
The idea behind how to throw a throwing knife without spin is very simple. It aims at ensuring that you can throw a knife at a target object or person without necessarily having the knife go through a complete spin.
While this process of knife throwing is called different names by different people, the idea is that no spin is required. Because the knife doesn’t go through a complete spin, it will likely hit the target more.
The Science Behind No-Spin Knife-Throwing
If you have been wondering how to throw a knife without spinning, let us quickly run through the physics behind it.
When you throw the knife, it gains momentum in the air making a radical shift. From a close study of its flight, you will discover that it spins but not so much to be noticeable.
So when the throw is referred to as a no-spin throw, it simply means there is an incomplete spin and not totally the absence of a spin. The spin’s incompleteness makes it more likely to hit the target.
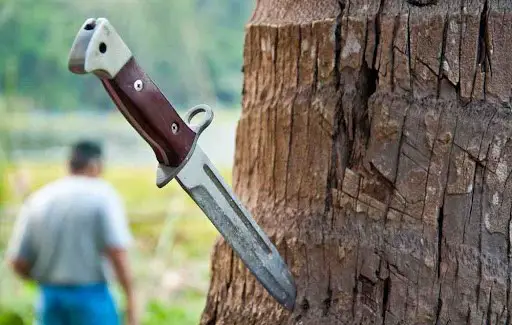
How Long Should the Knife Be?
The material that makes a special throwing knife is as significant as its size and balance. The size of the knife affects the throw, and this depends on how well you have mastered throwing a knife without spinning. While a beginner can use smaller knives to enhance precision, a professional might better understand how it works.
How Should the Balance of the Knife Be?
The knife should be well-balanced. It is always very difficult for you to hit the target when you use a knife that is not balanced. Even if you know how to hold a throwing knife or throw it properly, your effort will go in vain if the knife isn’t balanced.
A balanced knife has its handle as light as the blade. The handle or grip should not be excessively heavy. Otherwise, your throw might not be as perfect as you want it to be.
1. Russian/Fedin
2. Mumyou-Ryu/Bo Shuriken
i. Front Throw
A. Koso no I
Level 1: Manji No Kata
Level 2: Toji no kata
Level 3: Chokushi no kata
Level 4: Koso no I
B. Jikishin
C. Uranami
ii. Side Throw
A. Hon uchi
B. Yoko uchi
C. Gyaku uchi
3. Traditional Japanese
4. Thorn
How to Throw Throwing Knives in Different Ways?
1. Russian/Fedin
The Russian technique is one of the easiest and most well-known knife-throwing techniques with no spin. The method has evolved from Russian Martial Arts and works best if you have mid-sized knives with lengths from seven to eleven inches. Let’s master this method.
The distinctive characteristics of this throwing style are the slide release and snappy arm motion. Draw the arm back first, and then suddenly pull it forward. The rapid back-and-forth motions make the Russian style of throw inappropriate for long knives but absolutely perfect for medium-length knives.
Russian style knife throwing form
Get a grip on the knife with your drive finger, and hold the knife between your thumb and curled fingers. The index finger should rest on the knife’s spine. The technique requires releasing the wrist early- creating a lengthy spin flight pattern, and generating power by the shoulder and arm’s extended wave motion.
An advantage of the Russian technique is it takes way less arm movement, and you can throw the knife over the shoulder level. For a successful throw, bend down with the knife like you are snapping a bullwhip and release it in the correct place. Make sure your forefinger is stiff and shoots along the knife tang when released. This will increase the possibility of making accurate throws.
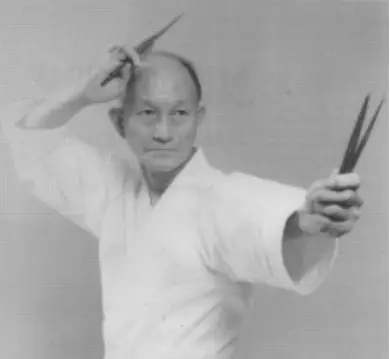
2. Mumyou-Ryu/Bo Shuriken
When learning how to throw throwing knives, this one is a great technique to master. The Bo Shuriken knife-throwing technique is known for its inflaming practice. With enough hours invested in the practice sessions, you can be the master of no-spin throwing.
In general, the Bo-Shuriken throwing knives are nine to twelve inches long and can cover a distance from three to nine meters. Let’s see what you need to consider checking for a perfect Mumyou-Ryu-style knife throw.
It is essential that you lock the wrist back at about 45 degrees, position the knife between your fore and index fingers, and support it with the thumb. Hold onto the knife like you are choking it while projecting the point out from the fingers.
Bo Shuriken knife throwing technique
To start the throwing motion, bring your hand straight down at an anticipated speed and control the knife’s trajectory with the fore and index fingers before it leaves your hand. You will almost feel like brushing the back of the blade.
Once you can master the correct technique, the knife will feel like slipping out of hand and flying straight to the target to stick in.
The more you become proficient with the throw, the less you will even have to hold the knife. It’s simply a matter of positioning the throwing knife in hand and going through the steps for a smooth slip-out.
In the shuriken technique, there are two basic types of throwing styles:
- To the front
- To the side
Both types of throws have their own distinctive forms, so let’s go through them one by one.
Front Throw
A. Koso no I
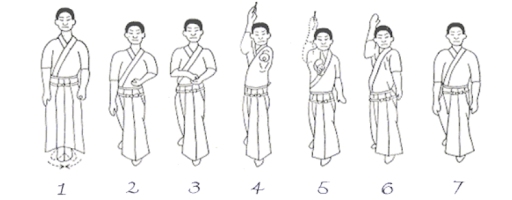
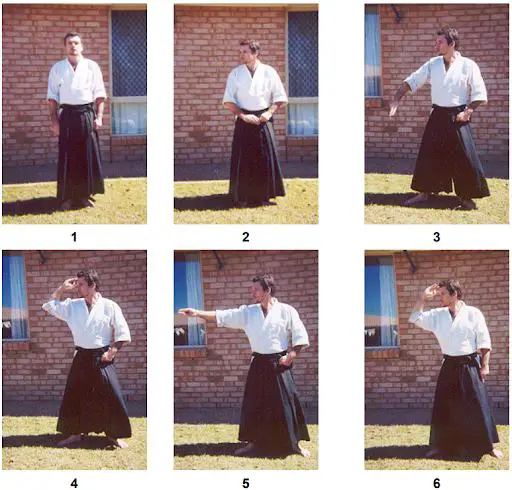
All the knife throwing techniques, including the Koso no I, require learning a series of steps that jump from basic to advanced. You can learn the Koso no I throw in four levels.
Level 1: Manji No Kata
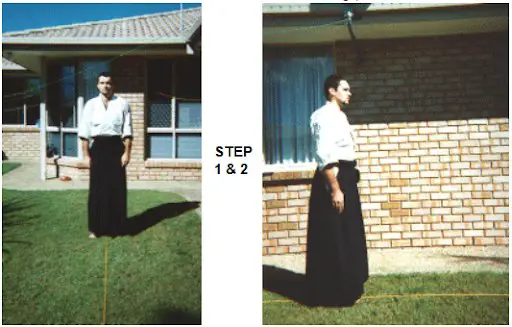
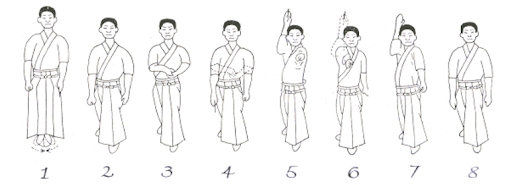
Level 1 has eight simple movements that form the essence of a constant throw. At level 1, you learn throwing without a knife to avoid the temptation of scoring a hit and keep concentrating on learning the form.
For preparation, stand naturally with the heels slightly kept apart and the feet wide open at a 60-degree angle. Keep the arms hanging down by the sides and your face directly towards the target.
Look at the target like you are striking a direct line from your abdomen. You will feel the target is giving you a response and giving information about the correct line.
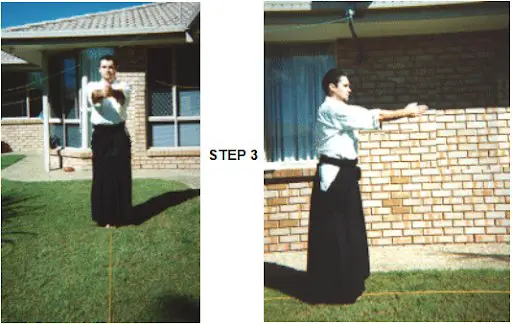
Swivel the feet inward like they are pointing forward, and straighten your arms. Hold your fingers together and keep the palms flat to the sides.
Then, raise both arms at a time, and swing them forward and up so they can directly meet palm-to-palm in front of your chest. Make sure the hands are postured horizontally to the surface, like diving through water.
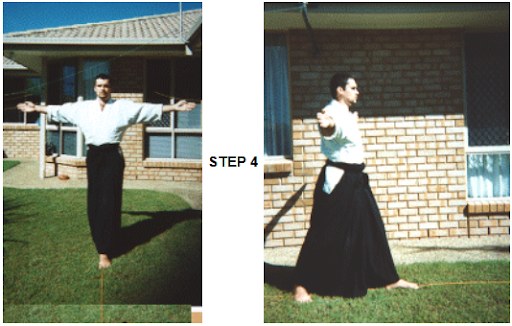
Next, slide your left foot forward along the striking line while turning the right foot at about 60 degrees outward angle until you find yourself standing in a comfortable stance. While sliding forward, keep opening the arms horizontally backward until they are 180 degrees apart from your left to right sides.
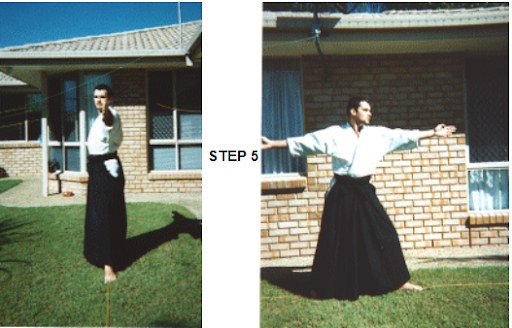
Turn your hip 90 degrees to the right while focusing on the target. Your left hand is still pointing to the target, and your right hand is reaching backward. Both hands have the palms facing to your right side.
Now bend your right-hand elbow to raise the hand and bring it up right behind your right ear. Keep the hand and wrist straight and keep the whole body still.
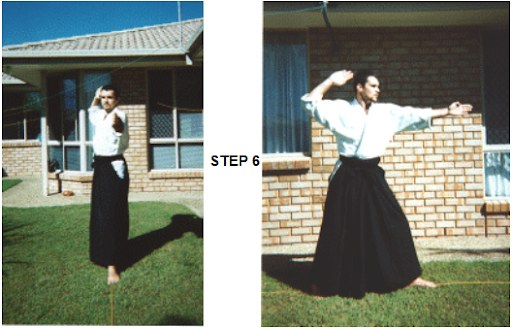
Next, turn your hips and face forward, incline on your left knee, and throw down your right-hand downward-forward, like throwing a knife directly toward the target. In the meantime, your left-hand drops to the side and hangs in a natural position.
Your right hand then goes down next to your left knee- take it back to your forehead and keep its fingers pointing upward. Let your thumb rest on the hairline as you feel the result of the throw.
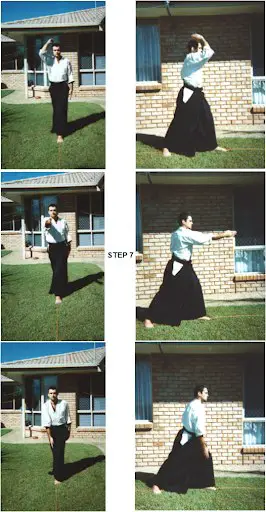
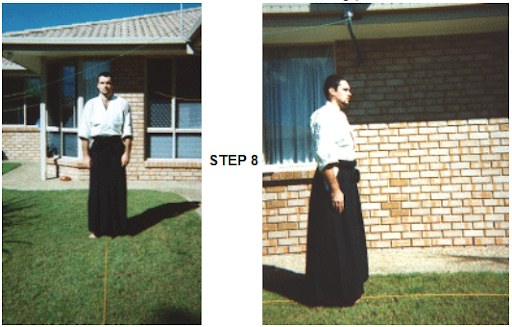
You can now step back, drop your right hand to the natural position, and stay posed, looking at the prey.
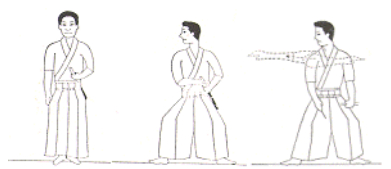
Level 2: Toji no kata
The second level brings in a concise number of steps to the Manji No Kata form. Some major differences between them include the subtraction of the manji shape and the arm raising from the side of the right ear. Also, you won’t need to put your right foot in front to step forward for the throw.
Toji no kata form
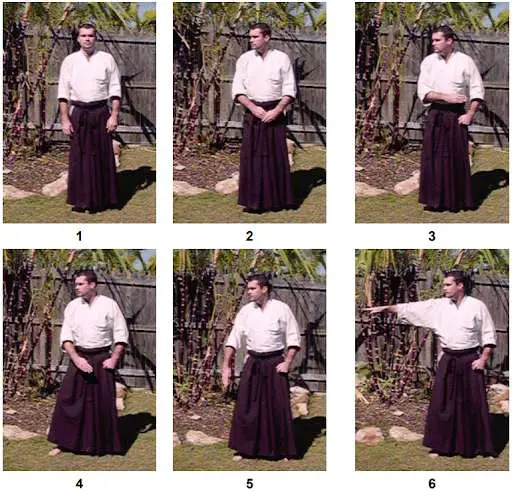
Level 3: Chokushi no kata
The third level shortens the form even further by subtracting the need to hold the right arm by the side. This way, your arm does a round movement to travel back to the rear and raises position behind your ear.
Chokushi no kata Form
Level 4: Koso no I
The final form is the actual core of the front throw movement. Your shape of throwing the knife becomes more natural and smoother with years of training.
With this posture, the throw is immediately available, and you don’t have to adjust the right arm before cutting it down. The supremacy of this form is you can focus on the target and strike a throw without missing.
Koso no I
B. Jikishin
If you find the Koso no I method somewhat complex, try the Jikishin. It’s just a simplified form of the Koso no I method with significant speed and an element of surprise. It works better at a short distance from the target and applies a different way of holding the knife.
Following the Jikishin method is helpful for a quick draw. The simple yet natural grip lets your right hand reach, takes the knife in a fast single move, and throws it as quickly as raising the arm. The drawback of the grip is it doesn’t allow you to throw over long distances.
The Jikishin technique keeps your hand relaxed, like holding a small egg, yet you can throw the knife like swinging a sword.
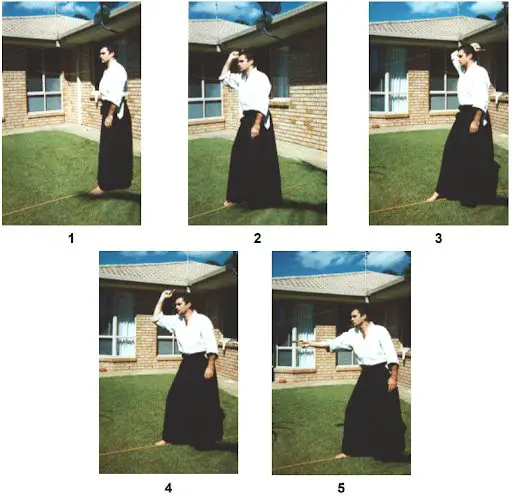
Jikishin throw form
C. Uranami
Uranami is the most difficult front knife-throwing technique we have discussed so far. Let’s now learn how to throw knives using this method.
The way it works resembles a softball pitch where you swing the arm at the right side from the natural to the downward pointing position and then forward it towards the target at a horizontal angle.
The Uranami technique is an “underhand” variation of the Jikishin throw, taking advantage of a right forward step when you throw the knife. Just like the Jikishin throw, this technique is also fast and has an element of surprise.
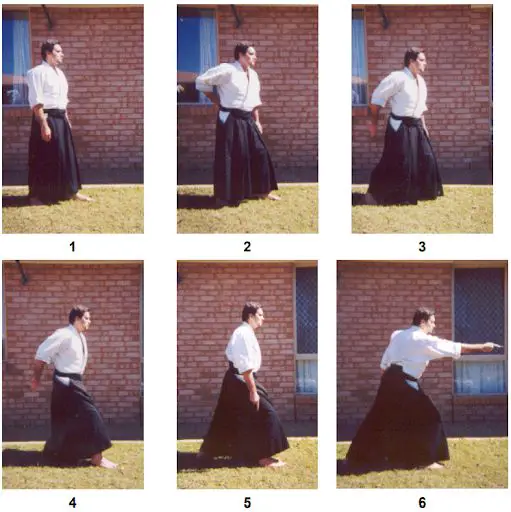
Uranami throw form
Side Throw
Side throw can be done in three different forms, both from a standing and sitting position:
a) Hon uchi for the basic over the arm throw
b) Yoko uchi for side way throw, and
c) Gyaku uchi for under the arm throw
Let’s now explore how to throw knives sideways, using these techniques.

1. Hon uchi, 2. Yoko uchi, and 3. Gyaku uchi throw forms
A. Hon uchi
Learning the hon uchi throw requires practice at different levels. The final form consists of all the core elements you know from different levels of over-arm throws. It involves two main movements: raise and throw.
Hon uchi throw form
B. Yoko uchi
Yoko uchi produces more power and is quicker than the hon uchi throwing technique. The main lesson here is to change the hand movement for a fast, powerful sideway throw- both from the left and right hand.
Yoko uchi and gyaku uchi throwing techniques mostly consist of different extensions and variations of the first form. So, you need to master the hon uchi throwing style first. This makes attaining the second and third forms easier though they are harder to learn.
Yoko uchi throws form
The illustration shows how you should take steps when passing the knife from one hand to the other and then throw it from a static posture. With the advanced form, you can do the stepping and throwing in a single movement.
C. Gyaku uchi
Because the throwing action produces from the shoulder, gyaku uchi is far more complex than the other two forms. You raise the arm with the palm facing downward until your hand points towards the prey. Stop your hand at this moment, and let the knife depart from your hand.
This throwing technique is different from uranami in the sense that you have to raise the hand from the front of your body with your palm facing down. In uranami, the hand comes from the side with the palm facing to the left.
Gyaku uchi form
3. Traditional Japanese
The traditional Japanese knife throwing evolved from the Japanese martial arts promoted by two prominent Japanese figures – Katori Shinto Ryu and Meifu Shinkage Ryu.
With a long-standing Japanese history, this technique works best with smaller knives and is known to be a more precise technique. To effect this throw, follow these steps.
Keep Your ARM in a Downward Motion
This placement of your hands is what helps you hold the knife firmly. This is very important considering the size of the blade, including the knife tip.
Follow up and AIM the Throw Directly at Target
As you let go of the knife and set it in motion, make sure your eyes are steadily fixed on the target.
4. Thorn
You need to consider many elements for successful thorn-style knife throwing. For instance, your gripping form depends on what you plan to do with the knife. Gripping with the index finger gives you more versatility, whereas gripping with the middle finger (pinch grip) is helpful for long-range throws with more power.
Another thing for consideration is the wrist action. It consists of a flipping or slapping action and affects the throw’s accuracy. You have to tilt it back and then move it forward to accomplish the correct thorn method.
Third, use the gripping finger to lightly stroke the knife handle when you release it. This is important to ensure a straight flight pattern for the knife. When the knife handle slides with your extended finger, it can prevent the blade from spinning.
You may still expect some rotation on the throws, especially when they’re longer. But you can keep the spin to a minimum once you master how to throw knives straight with this technique.
Timing is the final element for consideration in the thorn method. Release the knife too early, and it will hit the target, pointing its nose up. Release it too late, and the blade will keep the nose down when touching the target point.
Once you understand all the necessary elements, you should go through these four steps for a successful thorn-style knife throwing:
Step 1
First, hold the knife firmly. You should grab it high up on the handle and use either the thumb grip or an improvised hammer grip for better stability. You have to use your whole arm for the throw, so make sure you have a solid grasp on the knife to control its path.
Step 2
Maintain a relaxed shoulder. A windmill-like motion is crucial for your arm to secure the perfect throwing in the thorn form.
Too much tension can cause strain on your tendons and ligaments, so shake out the arm and loose up your body before you start. You can end up with injury with a careless session.
Step 3
Draw the arm back beside your head and bend the throwing arm a bit to secure it into place. Form a 35-40 degree angle with your upper arm and elbow.
Now, raise your arm until it reaches above and behind your head. The key to the thorn technique is to use your whole arm rather than the pushing power of your forearm.
Step 4
Use your entire arm to throw the knife toward the target. Drop the arm rapidly in a circular arc without bending the elbow and release the blade just before the hand aligns with the target.
Propel your index finger forward through the release phrase and conclude the throw, so the knife doesn’t spin. With the correct execution, the knife should reach the target smoothly through a direct line.
Hold the Knife by the Handle Firmly
Two grip types are available here: the thumb or modified hammer grip. Both ensure a firm knife grip but shouldn’t be so tight.
Use Your Arm
As you advance to throw, a circular arm will be created that requires your arm to be dropped in. Make sure your arm doesn’t fall off before you release the knife for its flight. Make sure you throw the knife with your eyes fixed on the target.
How to Throw a Knife Without it Spinning? One Real Method!
Explaining how to throw a knife without a spin in one real method is not an easy task to complete. However, I will share how I go about mine to set a good pace for you to learn.
When throwing, I hold my index finger and thumb and have my forefinger laid flat. The remaining fingers are wrapped across the handle very tight. This way, the knife doesn’t fall off.
A throw is affected from the shoulder, not the elbow, as is the usual case. Here, it is important that the knife is in a straight line with your hand and pointed at the target. As you throw the knife, follow it through until it hits the target…
Ensuring Own Safety
A knife is a sharp object that can hurt you when it comes in contact with your body or any part of it. So when throwing a knife at a target, it is imperative that you learn how to throw throwing knives and stick to some safety precautions, some of which include:
- Make sure you understand what is required of any throwing technique before you engage it. Also, Make sure to precisely follow the instructions.
- Keep the environment cleared of anything that can affect your throw or be affected by it. Take people, most especially children, and items away to safety.
- Wear safety gear like goggles that will shield your eyes. Also, you may keep an essential first-aid box near you in case of any unfortunate accidents.
Knowing how to throw a knife straight is an awe-inspiring ability that has to be developed. When you know how to throw a knife straight using different techniques, You’ll start to enjoy the adrenalin rush it brings along!
To improve, ensure you’ve read all the instructions provided here. You can boast about your skill anywhere and any time with the proper knowledge about throwing knives straight!
Don’t forget to keep your knives super sharp with knife sharpeners for better performance.


Leave a Comment