When it comes to hunting, focus is the key. And if you are in discomfort, it is difficult to focus. Especially if you are on your feet for a long time, thus, making DIY hunting stools can save you money and improve your hunting experience.
Depending on your need and the tools you have, you can make different types of stools. To start, you can make a tree-balanced stool. In case it’s not convenient to sit, you can improve it on a leg stool. If you are looking for comfort, then a three-leg stool can be your savior.
While you can easily get a hunting stool from the market or online, making one by yourself is an exciting experience. Especially if you haven’t made one before. In this post, you will learn to make three easy DIY hunting stools that will make your hunting more convenient. They are easy to make as well as carry.
How To Make DIY Hunting Stool
There are different types of hunting stools. In case you want to make one yourself and you are not an expert in carpentry, then you must be looking for something easy and convenient. If so, you are in the right place. The process of making three different types of hunting stools and their benefits are discussed in the following.
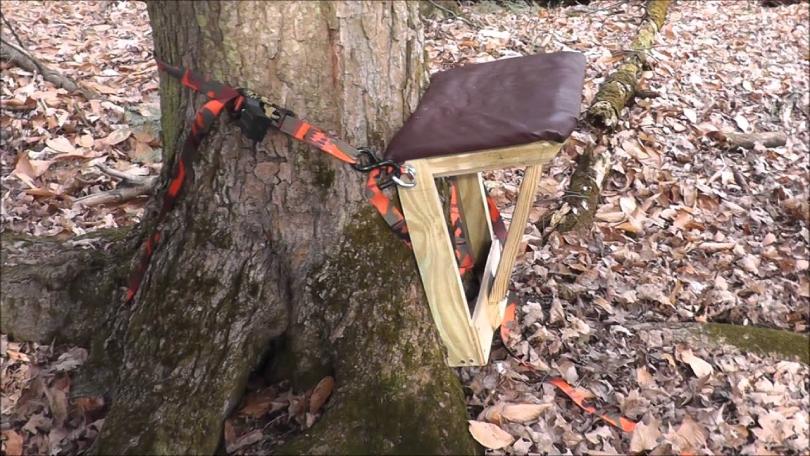
Tree Balanced Hunting Stool
If you are new to hunting and want to make something from scratch, then tree-balanced hunting stools are the best way to go. You will need some minimal instruments to make it, and you can carry it in the Woods or anywhere if you have a tree to tie it up.
Requirements:
- 2″ Plywood
- Wood shaping tools
- Saw
- Rope
Procedure
Step 1: Shaping The Plywood
Shaping the plywood is very easy. For this, you will need a saw and measuring tape. First, cut a piece of plywood in the size of 12″ × 13″. This is a standard size.
On the side of the plywood that you want to attach a tree with, make a curve. The curve should not be too much. Otherwise, it won’t fit the larger trees. Once you are done with carving, try to polish the age of the curve.
Step 2: Making Holes For The Rope
Once you are done with carving and polishing, it is time to make holes for putting the rope. On the other two sides of the plywood, mark 4 spots to make holes for rope. The gap between the holes on the same side should be at least 3 to 5 inches.
After you have cut the holes, you need to polish them. Make sure they can hold the rope into place and are not so scratchy that the rope will get cut off.
Step 3: Tying Up The Seat
The main part of the seat is to assemble into a seat during hunting. To start, first, make a strong knot of the rope. Now insert it from one whole and make a loop around the tree and insert the rope into the parallel hole.
Now loop it from the other hole on the same side and turn it around from the tree, and put it on the parallel hole. Make it tight enough to hold the grip on the tree. You can make several wraps in a similar motion to get the required grip you want.
This way, you can make your hunting stool anywhere you have a strong tree to lean the seat. You can adjust the size of the seat according to your preference.
Benefits:
- If you don’t like to work with Nails and hammers but still want to make a tool, then this is your best option.
- If you are hunting in the woods and don’t want to carry a lot of loads, then this tool is your best DIY sitting arrangement.
One Leg Hunting Stool
One leg hunting stool can be made from materials that are just lying around in the garage. You will need just an hour to two to make the stool. The requirements and the procedures are discussed in the following.
Requirements:
- ½” thick plywood
- 1″ × 1″ hardwood square
- Saw
- Scale
- Electric Drill
Procedure:
Step 1: First, make the seating plate from the plywood. On one side, make a curve to help it lean on trees.
Step 2: Make two holes for the pedestal. One is in the center, and the other is on the opposite side of the curvature. That way, you can use the stool in two ways.
Step 3: Make the ground platform with this similar Plywood. Make it small. Just hold on to the pedestal and protect it from getting into the soil.
Step 4: Once you are done with making the seat and the platform, it is time to make the pedestal. Use glue to attach and cross two 1″ × 1″ hardwood squares. This will be a pedestal.
Step 5: Make holes for straps. You can make the strap from ropes or buy hook straps.
Step 6: The last thing to do is apply varnish to the stool. You need to make it smooth so that it doesn’t get stuck to your clothes when you sit on it.
Benefits:
- Even though it is one pedestal stool, you can just sit on it without a tree or anything to lean on.
- Making this stool does not require you to buy stuff from the market; rather, you can use unused plywood.
- The setting is easy to unveil. Thus it makes the stool portable and lightweight.
- For a more comfortable sitting position, you can construct it with trees or stone.
3 Legged Hunting Stool
If you talk about flexibility and the most comfortable DIY hunting stools, then this is your way to go. It’s very easy to make and easy to carry. The process is described for you to fall for you to follow.
Requirements:
- Scale or measuring tape
- Marking pencil
- Sander
- Electric drill
- Rag
- Scissors
- Saw
- 3 hardwood dowel
- ¼” × 3″ steel bolt
- ¼” nut
- ¼” × 2″ eye bolt
- 36″ × 36″ Bridle Leather (any strong leather will work)
- Screw
Procedure:
Step 1: Preparing Dowel
To begin with, cut the three dowels at 24 inches. You can do it with an electric saw or a hand saw. Now with the pencil mark with 10.5″ each dowel.
On the marked point, make a hole all the way to the other side. Do it on all three dowels in the same spot. Then on the top of the legs, mark the center of the dowel. Then drill a pilot hole to hold the screw.
The end of the dowel touching the ground needs to be sanded down to increase the grip. Then varnish the legs with tung oil and let them dry. You can apply the tuning oil with a rag or brush.
Step 2: Making a Leather Seat
This process is easier than preparing the leg of the stool. But it might come with some trial and error. To begin with, first, take the leather and measure it in the shape of a triangle. You will be needing an equilateral triangle.
Always do overestimation because if it doesn’t fit, you can cut it back, but if you cut it more, then you cannot go back. Your target will be to achieve 19.5″ on each side.
To do a better job, you can first cut cardboard or paper as the targeted measurement. Then use that piece as a template to cut the real leather.
Step 3: Assemble The Dowel
Once the dowels are dried, it is time to assemble them. To begin, first, insert a 3″ bolt on a washer and then put it on one of the legs.
Then place the eyebolt and the second leg. Place a nut on the bolt without tightening. Similarly, attach the third leg.
Step 4: Attach The Leather Seat
Once the dowels are attached together, unfold the tool and get the exact size of the seat. Do not over-stretch the unfolding; otherwise, the dowels might get detached.
Attach the leather with the legs using screws. Again, do not stretch it too much. Here you have your portable hunting stool ready.
Benefits:
- It is very easy to make with the things you may have within your reach.
- As the seat has 3 legs, it is not dependent on any tree or stone.
- The weight is very minimal and easy to carry.
- The sitting balance is good, which makes it easier to focus on hunting.
Final Words
During hunting, it is not always possible to stand on your feet for a long time. And in some cases, you need to sit on something to balance your target. If you have proper instruments, then you can easily make up your DIY hunting stools for your hunting.
Here we have provided 3 hunting stools that are convenient for different situations and arrangements. Depending on your preferences, you can choose any of them you like.


Leave a Comment